
Have you seen that Printed Solid carries a range of filaments blended with metal powders? These materials consist of fine metal powders blended in a PLA matrix. We carry colorFabb bronzeFill, copperFill, brassFill, and steelFill as well as Proto-Pasta composite Stainless Steel, Magnetic Iron, and Copper PLA blends.
This past month's (February 2018) Maker Box featured Proto-Pasta Composite Copper HTPLA as one of the 4 featured samples. Alex from Proto-Pasta, Joe Mike Terranella (from YouTube Channel of the same name), and myself got to talking about how we could turn the otherwise reddish orange material into a nice green for St Patrick's Day. The answer was, of course, to patina the material. Joe Mike put together a video. Alex will be putting together a blog post (we'll link that here when he does it). I did a little bit of experimenting as well.
I wanted to figure out what would create a nice green patina and how the materials were different. Here's what I did:
Select a file:
Pick out a file to 3D Print or Design your own, slice, and print. For demonstration pieces, I like to slice with a high density to show off the heft of the filaments, and give me a little extra material to sand down.
I chose Shamrock Coin by BLNorris https://www.thingiverse.com/thing:2006 It's an easy print and easy to sand and polish. As a bonus, it is also easy to sand a top surface without sanding the base below.
Compare the materials:
I printed 3 sets of 3 coins each using the exact same gcode.
One set in Proto-Pasta Composite Copper, one in colorFabb copperFill, and one in Leaf Green colorFabb PLA/PHA. All were sliced in Cura and printed on the Ultimaker 3 equipped with 3D Solex Hardcore and 0.4mm Everlast Sapphire Nozzle. Note that we do not necessarily consider a hardened nozzle to be a must with copper since it is fairly soft, but it doesn't hurt. Also note that I personally prefer a 0.6mm nozzle, but was evaluating this one for a customer who was having some trouble with it.
Comparing the bare filaments themselves. The plain PLA/PHA feels smooth and with a nice amount of flex to it. You can tie it in a not without breaking. The protoPasta copper is much stiffer; it will break before it bends to much. It is smooth and a reddish color. The colorFabb copperFill breaks easily as well, but it is malleable. If you bend it, you can fairly easily bend it into a shape that it will retain before it breaks. The colorFabb is a lighter brownish red and has a rough feel.
On to printing. They all print pretty easily. I find that I need to increase temp and flow rate for both the fills vs the plain PLA. 110% seemed pretty good. It probably could have been a hair lighter to give a smoother top surface, but again, my intent was to sand these down.
The materials all printed pretty easily without a lot of stringing and with no warping.
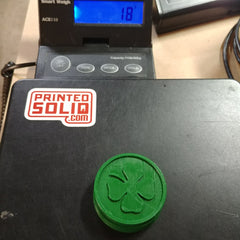
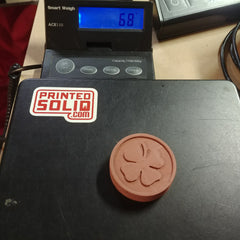
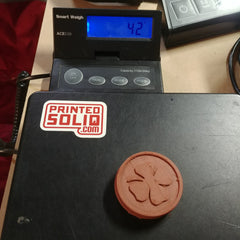
Finally, after the prints were complete, I weighed them. The results show how different the amount of metal content is in these materials. The colorFabb copperFill is the heaviest. Since we are weighing the same objects sliced with the same files, this means that the volume of filament, and the length of filament used to print the objects is the same. So, we know that the colorFabb has quite a bit more metal in the matrix than the Proto-Pasta. This is significant for a few reasons. You would use the colorFabb material if you wanted a higher density part or higher content. We have customers that buy this material for technical purposes (EMI shielding, etc) and the metal content is important. However, if you just want the polished finish with a little extra weight, the Proto-Pasta material will give you more length of filament per gram, so it may be a better choice.
| Material | Weight of 3 Coins (g) |
| colorFabb PLA/PHA | 16 |
| Proto-Pasta Composite Copper HTPLA | 42 |
| colorFabb copperFill | 68 |
Expose the metal
Sand the part using progressively finer grits of sandpaper. I used wet sanding and went through the following grits and types of sand papers. 90, 180, 320, and emery paper. I did all the sanding wet.
When you sand, you want to be patient and let the paper do the work. Don't push down hard.
A trick I used from preparing cross sections of electronics was to sand with each paper until all lines from the previous paper are completely gone.
I also found that I like these sanding blocks from Lowe's. After they've worn down a bit, they are kind of nice for polishing.

Once you have gotten to the finest grit of sand paper, rinse the part off with clean water and pat it dry. Polish the paper using polishing cloths until you have a smooth finish.
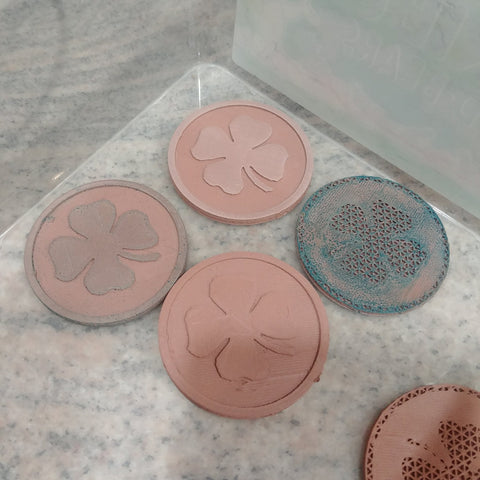
For these coins, I polished the upper most top surfaces only. This leaves the recessed surfaces still encapsulated in PLA, so that when we go to Patina them, they will remain the reddish color of the filament for a cool two tone effect.

Patina
I did some Google Fu for different techniques for creating a patina on copper and found a number of advised methods. The easiest ones seemed to be simply using vinegar. I tested different types of vinegars with and without salts and decided that I was going to go with white vinegar. Here are some pics of different test pieces.
What I ended up doing was filling a bowl with a little bit of white vinegar, then putting a paper towel in the vinegar to give the pieces a surface to stand on without being partially submerged. I think wetted the surfaces of the coins with vinegar, set it in a pyrex tupperware bowl, and covered.
I then used a little bit of science to get things moving. I boiled a little bit of water, about half an inch deep in a pan. I turned the heat off so it was no longer at a rolling boil, and set my bowl in the water. Since creating a patina is a chemical reaction and chemical reactions are greatly accelerated by heat, this got me a nice patina much quicker.
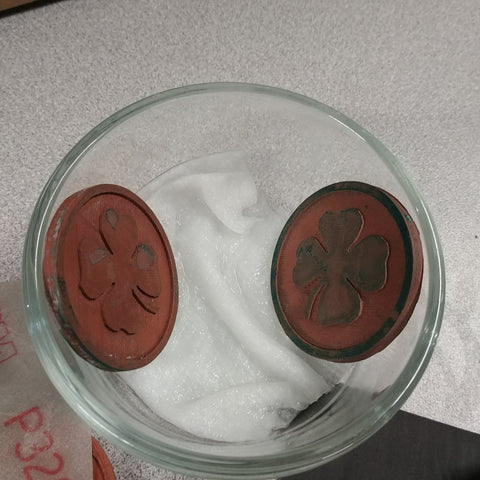
After a few hours, I took the parts out and this was the result with Proto-Pasta on the right and colorFabb on the left. Some interesting observations: The colorFabb took on much more of a green patina. I believe this is due to the higher metal content. The Proto-Pasta had about the same green, but only where droplets had been sitting on the part.
You can also see that the areas that were not polished did not patina at all. This is because the copper was still covered in a film of PLA. Kind of a neat effect, right?

One last picture showing a few more example effects I played around with:
